Introduction About Kubernetes
Kubernetes is also known as k8s. Kubernetes is an extensible, portable, and open-source container management platform designed by Google. Kubernetes helps to manage containerised applications in various types of physical, virtual, and cloud environments.
Introduction
Kubernetes (also known as k8s) is an extensible, portable, and open-source container orchestration platform designed by Google. Kubernetes helps to manage containerized applications in various types of physical, virtual, and cloud environments.
Kubernetes helps you to control the resource allocation and traffic management for cloud applications and microservices. It also helps to simplify various aspects of service-oriented infrastructures. Kubernetes allows you to assure where and when containerized applications run and helps you to find resources and tools you want to work with.
The term "k8s" comes from abbreviating the 8 letters between "K" and "s" in "Kubernetes".
Kubernetes Features
Automated Scheduling
Automatically places workloads on nodes based on resource requirements and constraints.
Self-Healing
Restarts failed containers, replaces and reschedules pods when nodes die.
Rollouts & Rollback
Automated deployment rollouts with automatic rollback on failure.
Scaling & Load Balancing
Horizontal pod scaling and automatic load distribution across pods.
Environment Consistency
Same environment across development, testing, and production.
Resource Efficiency
Higher density of resource utilization through intelligent bin-packing.
Loose Coupling
Components act as separate units, enabling microservices architecture.
Enterprise Ready
Built-in security, RBAC, secrets management, and production-grade features.
Kubernetes Architecture
Control Plane (Master Node) Components
The control plane is the brain of the Kubernetes cluster, responsible for management and administrative tasks. Multiple master nodes provide fault tolerance.
Central management hub that exposes Kubernetes API. All cluster operations are performed through the API server. Tools like kubectl and Dashboard communicate with it via REST APIs.
Runs controller processes that regulate cluster state. Includes replication controller, endpoint controller, namespace controller, and service account controller. Works to match current state with desired state.
Assigns pods to available nodes based on resource requirements, constraints, and affinity/anti-affinity rules. Tracks node resource utilization for optimal placement.
High-availability distributed key-value store for cluster configuration data. Stores all cluster state and metadata. Accessible only by API server for security.
Worker Node Components
Worker nodes run the actual application workloads. Each node contains services to manage containers, communicate with the control plane, and allocate resources.
Primary node agent that communicates with the control plane. Ensures containers are running in pods as specified. Manages pod lifecycle, health checks, and resource allocation.
Network proxy running on each node. Maintains network rules for pod-to-pod and external communication. Handles service IP translation and basic load balancing.
Software responsible for running containers (Docker, containerd, CRI-O). Pulls images and manages container lifecycle on the node.
Kubernetes Key Terminologies
Cluster:
It is a collection of hosts(servers) that helps you to aggregate their available resources. That includes ram, CPU, ram, disk, and their devices into a usable pool.
Master:
The master is a collection of components which make up the control panel of Kubernetes. These components are used for all cluster decisions. It includes both scheduling and responding to cluster events.
Node:
A node is a working machine in Kubernetes cluster . They are working units which can be physical, VM, or a cloud instance.Each node has all the required configuration required to run a pod on it such as the proxy service and kubelet service along with the Docker, which is used to run the Docker containers on the pod created on the node.
Namespace:
It is a logical cluster or environment. It is a widely used method which is used for scoping access or dividing a cluster. It provides an additional qualification to a resource name. This is helpful when multiple teams are using the same cluster and there is a potential of name collision. It can be as a virtual wall between multiple clusters.
Following are some of the important functionalities of a Namespace in Kubernetes
- Namespaces help pod-to-pod communication using the same namespace.
- Namespaces are virtual clusters that can sit on top of the same physical cluster.
- They provide logical separation between the teams and their environments.
apiVersion: v1
kind: Service
metadata:
  name: elasticsearch
  namespace: elk
  labels:
      component: elasticsearch
spec:
  type: LoadBalancer
  selector:
      component: elasticsearch
  ports:
  - name: http
      port: 9200
      protocol: TCP
  - name: transport
      port: 9300
      protocol: TCP
Labels and Selectors:
Labels are key-value pairs which are attached to pods, replication controller and services. They are used as identifying attributes for objects such as pods and replication controller. They can be added to an object at creation time and can be added or modified at the run time.
Unlike names and UIDs, labels do not provide uniqueness. In general, we expect many objects to carry the same label(s).
A label selector is just a fancy name of the mechanism that enables the client/user to target (select) a set of objects by their labels.
It can be confusing because different resource types support different selector types - 'selector' vs 'matchExpressions' vs 'matchLabels':
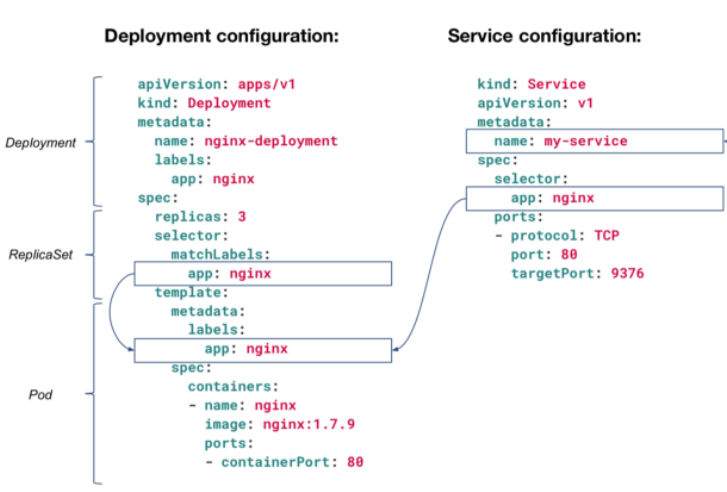
Newer resource types like Deployment, Job, DaemonSet, and ReplicaSet support both 'matchExpressions' and 'matchLabels', but only one of them can be nested under the 'selector' section, while the other resources (like "Service" in the example above) support only 'matchLabels', so there is no need to define which option is used, because only one option is available for those resource types.
Kubernetes Services
A Service is an abstraction that defines a logical set of Pods and a policy for accessing them. It provides a single, stable IP address and DNS name for accessing pods, making load balancing and service discovery simple.
kind: Service
apiVersion: v1
metadata:
  name: nginx-service
spec:
  selector:
    app: nginx
  ports:
    - protocol: TCP
      port: 80
      targetPort: 9376
Service Types Comparison
ClusterIP
Default type. Exposes service on internal cluster IP only. Use for internal communication between pods.
NodePort
Exposes service on static port (30000-32767) on all nodes. Use for development and testing access.
LoadBalancer
Provisions external load balancer from cloud provider. Use for production internet-facing services.
ExternalName
Maps service to external DNS name (CNAME). Use for accessing external services from within cluster.
ClusterIP - Internal Service Access
ClusterIP is only reachable from within the cluster - not accessible from external clients.
apiVersion: v1
kind: Service
metadata:
  name: nginx-clusterip-service
spec:
  selector:
    app: nginx
  type: ClusterIP
  ports:
    - protocol: TCP
      port: 80
      targetPort: 80
NodePort - External Access via Node IP
Access the service from outside the cluster using http://<NodeIP>:<NodePort> where NodePort is in range 30000-32767.
apiVersion: v1
kind: Service
metadata:
  name: nginx-nodeport-service
spec:
  selector:
    app: nginx
  type: NodePort
  ports:
    - protocol: TCP
      port: 80
      targetPort: 80
      nodePort: 30080
LoadBalancer - Cloud Provider External Access
LoadBalancer automatically creates ClusterIP and NodePort services underneath. Requires cloud provider integration (AWS ELB, GCP Load Balancer, Azure LB).
apiVersion: v1
kind: Service
metadata:
  name: nginx-loadbalancer-service
spec:
  type: LoadBalancer
  selector:
    app: nginx
  ports:
    - protocol: TCP
      port: 80
      targetPort: 80
      nodePort: 30080
ExternalName - External Service Mapping
Maps the service to an external DNS name instead of typical selectors.
apiVersion: v1
kind: Service
metadata:
  name: my-database
spec:
  type: ExternalName
  externalName: db.example.com
Pod
A pod is a collection of containers and its storage inside a node of a Kubernetes cluster. It is possible to create a pod with multiple containers inside it. For example, keeping a database container and data container in the same pod.
There are two types of Pods
- Single container pod
- Multi container pod
Single Container Pod
If you defined single image on Pod Specification then it would created with single container.
apiVersion: v1
kind: Pod
metadata:
  name: nginx
spec:
  containers:
  - name: Nginx
    image: nginx
    ports:
containerPort: 7500
  imagePullPolicy: Always
Multi Container Pod
If you defined multiple image on Pod Specification then it would created with multi container with each image specified.
apiVersion: v1
kind: Pod
metadata:
  name: nginx
spec:
  containers:
  - name: Nginx
    image: nginx
    ports:
      containerPort: 7500
    imagePullPolicy: Always
  - name: Database
    Image: mongoDB
    Ports:
      containerPort: 7501
    imagePullPolicy: Always
Deployments
Deployments are upgraded and higher version of replication controller and additional feature from ReplicaSet. They manage the deployment of replica sets which is also an upgraded version of the replication controller. They have the capability to update the replica set and are also capable of rolling back to the previous version.
They provide many updated features of matchLabels and selectors. We have got a new controller in the Kubernetes master called the deployment controller which makes it happen. It has the capability to change the deployment midway.
apiVersion: apps/v1
kind: Deployment
metadata:
  name: nginx
spec:
  selector:
    matchLabels:
      app: nginx
  replicas: 1
  template:
    metadata:
      labels:
        app: nginx
    spec:
      containers:
      - name: nginx
        image: nginx
        ports:
          - name: http
            containerPort: 80
Secrets
A Secret is an object that contains a small amount of sensitive data such as a password, a token, or a key. Such information might otherwise be put in a Pod specification or in a container image. Using a Secret means that you don't need to include confidential data in your application code.
Because Secrets can be created independently of the Pods that use them, there is less risk of the Secret (and its data) being exposed during the workflow of creating, viewing, and editing Pods. Kubernetes, and applications that run in your cluster, can also take additional precautions with Secrets, such as avoiding writing secret data to nonvolatile storage.
Secrets are similar to ConfigMaps but are specifically intended to hold confidential data.
There are three main ways of uses for Secrets:
- As files in a volume mounted on one or more of its containers.
- As container environment variable.
- By the kubelet when pulling images for the Pod.
apiVersion: v1
data:
  username: admin
  password: Passw0rd0
kind: Secret
metadata:
  name: mysecret
type: Opaque
To use a Secret in an environment variable in a Pod:
- Create a Secret (or use an existing one). Multiple Pods can reference the same Secret.
- Modify your Pod definition in each container that you wish to consume the value of a secret key to add an environment variable for each secret key you wish to consume. The environment variable that consumes the secret key should populate the secret's name and key in env[].valueFrom.secretKeyRef.
- Modify your image and/or command line so that the program looks for values in the specified environment variables.
apiVersion: v1
kind: Pod
metadata:
  name: secret-env-pod
spec:
  containers:
  - name: mycontainer
    image: redis
    env:
      - name: SECRET_USERNAME
        valueFrom:
          secretKeyRef:
            name: mysecret
            key: username
            optional: false # same as default; "mysecret" must exist
                            # and include a key named "username"
      - name: SECRET_PASSWORD
        valueFrom:
          secretKeyRef:
            name: mysecret
            key: password
            optional: false # same as default; "mysecret" must exist
                            # and include a key named "password"
  restartPolicy: Never
Create a Secret from File , run the below command to do the same. However the adjust the file location according to your file location available.
kubectl create secret mysecret-from-file db-user-pass --from-file=./username.txt --from-file=./password.txt
To use a Secret as a File in a Pod:
If you want to access data from a Secret in a Pod, one way to do that is to have Kubernetes make the value of that Secret be available as a file inside the filesystem of one or more of the Pod's containers.
- Create a secret or use an existing one. Multiple Pods can reference the same secret.
- Modify your Pod definition to add a volume under .spec.volumes[]. Name the volume anything, and have a .spec.volumes[].secret.secretName field equal to the name of the Secret object.
- Add a .spec.containers[].volumeMounts[] to each container that needs the secret. Specify .spec.containers[].volumeMounts[].readOnly = true and .spec.containers[].volumeMounts[].mountPath to an unused directory name where you would like the secrets to appear.
- Modify your image or command line so that the program looks for files in that directory. Each key in the secret data map becomes the filename under mountPath.
apiVersion: v1
kind: Pod
metadata:
  name: mypod
spec:
  containers:
  - name: mypod
    image: redis
    volumeMounts:
    - name: username.txt
      mountPath: "/etc/username.txt"
      readOnly: true
    - name: password
      mountPath: "/etc/password.txt"
      readOnly: true
  volumes:
  - name: username.txt
    secret:
      secretName: mysecret-from-file
      optional: false # default setting; "mysecret" must exist
  - name: password.txt
    secret:
      secretName: mysecret-from-file
      optional: false # default setting; "mysecret" must exist