Terraform is an open-source Infrastructure as Code(IaC) tool developed by HashiCorp. It is used to define and provision the complete infrastructure using an easy-to-learn declarative language.
It is an infrastructure provisioning tool where you can store your cloud infrastructure setup as codes. It's very similar to tools such as CloudFormation, which you would use to automate your AWS infrastructure, but you can only use that on AWS. With Terraform, you can use it on other cloud platforms as well.
Below are some of the benefits of using Terraform.
- Does orchestration, not just configuration management
- Supports multiple providers such as AWS, Azure, GCP, DigitalOcean and many more
- Provide immutable infrastructure where configuration changes smoothly
- Uses easy to understand language, HCL (HashiCorp configuration language)
- Easily portable to any other provider
- Supports Client only architecture, so no need for additional configuration management on a server
Note
Infrastructure as Code (IaC) is a widespread terminology among DevOps professionals. It is the process of managing and provisioning the complete IT infrastructure (comprises both physical and virtual machines) using machine-readable definition files. It is a software engineering approach toward operations. It helps in automating the complete data center by using programming scripts.
Installation of Terraform
Terraform Core concepts
Terraform core uses two input sources to do its job.
The first input source is a Terraform configuration that you, as a user, configure. Here, you define what needs to be created or provisioned. And the second input source is a state where terraform keeps the up-to-date state of how the current set up of the infrastructure looks like.
So, what terraform core does is it takes the input, and it figures out the plan of what needs to be done. It compares the state, what is the current state, and what is the configuration that you desire in the end result. It figures out what needs to be done to get to that desired state in the configuration file. It figures what needs to be created, what needs to be updated, what needs to be deleted to create and provision the infrastructure.
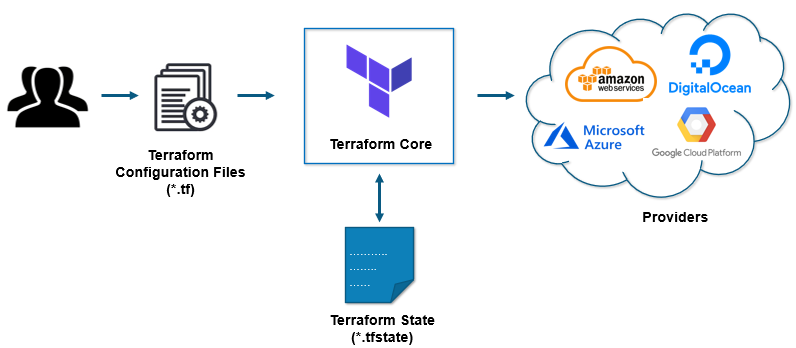
The second component of the architecture are providers for specific technologies. This could be cloud providers like AWS, Azure, GCP, or other infrastructure as a service platform. It is also a provider for more high-level components like Kubernetes or other platform-as-a-service tools, even some software as a self-service tool.
It gives you the possibility to create infrastructure on different levels.
For example - create an AWS infrastructure, then deploy Kubernetes on top of it and then create services/components inside that Kubernetes cluster.
Terraform has over a hundred providers for different technologies, and each provider then gives terraform user access to its resources. So through AWS provider, for example, you have access to hundreds of AWS resources like EC2 instances, the AWS users, etc. With Kubernetes provider, you access to commodities, resources like services and deployments and namespaces, etc.
Below are the core concepts/terminologies used in Terraform:
-
Provider: It is a plugin to interact with APIs of service and access its related resources.
-
Resources: It refers to a block of one or more infrastructure objects (compute instances, virtual networks, etc.), which are used in configuring and managing the infrastructure.
-
count and for_each Meta Arguments: - It allow us to create multiple instances of any resource.
-
Data Source: It is implemented by providers to return information on external objects to terraform.
-
State: It consists of cached information about the infrastructure managed by Terraform and the related configurations.
-
Module: It is a folder with Terraform templates where all the configurations are defined
-
Input Variables: It is key-value pair used by Terraform modules to allow customization.
-
Local Variables: It work like standard variables,but their scope is limited to the module where they're declared.
-
Output Values: These are return values of a terraform module that can be used by other configurations.
Provider
A provider works pretty much as an operating system's device driver. It exposes a set of resource types using a common abstraction, thus masking the details of how to create, modify, and destroy a resource pretty much transparent to users.
Terraform downloads providers automatically from its public registry as needed, based on the resources of a given project. It can also use custom plugins, which must be manually installed by the user. Finally, some built-in providers are part of the main binary and are always available.
Although not strictly necessary, it's considered a good practice to explicitly declare which provider we'll use in our Terraform project and inform its version. For this purpose, we use the version attribute available to any provider declaration:
provider "aws" {
   access_key = "B5KG6Fe5GUKIATUF5UD"
   secret_key = "R4gb65y56GBF6765ejYSJA4YtaZ+T6GY7H"
   region = "us-east-2"
}
Resources
In Terraform, a resource is anything that can be a target for CRUD operations in the context of a given provider. Some examples are an EC2 instance, an Azure MariaDB, or a DNS entry.
Let's look at a simple resource definition:
First, we always have the resource keyword that starts a definition. Next, we have the resource type, which usually follows the provider_type convention. In the above example, aws_instance is a resource type defined by the AWS provider, used to define an EC2 instance. After that, there's the user-defined resource name, which must be unique for this resource type in the same module -- more on modules later.
Finally, we have a block containing a series of arguments used as a resource specification. A key point about resources is that once created, we can use expressions to query their attributes. Also, and equally important, we can use those attributes as arguments for other resources.
To illustrate how this works, let's expand the previous example by creating our EC2 instance in a non-default VPC
resource "aws_vpc" "apps" {
   cidr_block = "10.0.0.0/16"
}

resource "aws_subnet" "frontend" {
   vpc_id = "${aws_vpc.apps.id}"
   cidr_block = "10.0.1.0/24"
}
resource "aws_instance" "web" {
   ami = "some-ami-id"
   instance_type = "t2.micro"
   subnet_id = "${aws_subnet.frontend.id}"
}
Here, we use the id attribute from our VPC resource as the value for the frontend's vpc_id argument. Next, its id parameter becomes the argument to the EC2 instance. Please note that this particular syntax requires Terraform version 0.12 or later. Previous versions used a more cumbersome "${expression}" syntax, which is still available but considered legacy.
This example also shows one of Terraform's strengths: regardless of the order in which we declare resources in our project, it will figure out the correct order in which it must create or update them based on a dependency graph it builds when parsing them.
count and for_each Meta Arguments
It allow us to create multiple instances of any resource. The main difference between them is that count expects a non-negative number, whereas for_each accepts a list or map of values.
For instance, let's use count to create some EC2 instances on AWS:
resource "aws_instance" "server" {
   count = "${var.server_count}"
   ami = "ami-xxxxxxx"
   instance_type = "t2.micro"
   tags = {
      Name = "WebServer - ${count.index}"
   }
}
Within a resource that uses count, we can use the count object in expressions. This object has only one property: index, which holds the index (zero-based) of each instance.
Likewise, we can use the for_each meta argument to create those instances based on a map:
variable "instances" {
   type = map(string)
}
resource "aws_instance" "server" {
   for_each = "${var.instances}"
   ami = "${each.value}"
   instance_type = "t2.micro"
   tags = {
      Name = "${each.key}"
   }
}
This time, we've used a map from labels to AMI (Amazon Machine Image) names to create our servers. Within our resource, we can use the each object, which gives us access to the current key and value for a particular instance.
A key point about count and for_each is that, although we can assign expressions to them, Terraform must be able to resolve their values before performing any resource action. As a result, we cannot use an expression that depends on output attributes from other resources.
Data Sources
Data sources work pretty much as "read-only" resources, in the sense that we can get information about existing ones but can't create or change them. They are usually used to fetch parameters needed to create other resources.
A typical example is the aws_ami data source available in the AWS provider, which we use to recover attributes from an existing AMI:
data "aws_ami" "ubuntu" {
   most_recent = true

   filter {
      name   = "name"
      values = ["ubuntu/images/hvm-ssd/ubuntu-trusty-14.04-amd64-server-*"]
   }

   filter {
      name   = "virtualization-type"
      values = ["hvm"]
   }
   owners = ["099720109477"]
}
This example defines a data source called "ubuntu" that queries the AMI registry and returns several attributes related to the located image. We can then use those attributes in other resource definitions, prepending the data prefix to the attribute name:
resource "aws_instance" "web" {
   ami = "${data.aws_ami.ubuntu.id}"
   instance_type = "t2.micro"
}
State
The state of a Terraform project is a file that stores all details about resources that were created in the context of a given project. For instance, if we declare an azure_resourcegroup resource in our project and run Terraform, the state file will store its identifier.
The primary purpose of the state file is to provide information about already existing resources, so when we modify our resource definitions, Terraform can figure out what it needs to do.
An important point about state files is that they may contain sensitive information. Examples include initial passwords used to create a database, private keys, and so on.
Terraform uses the concept of a backend to store and retrieve state files. The default backend is the local backend, which uses a file in the project's root folder as its storage location. We can also configure an alternative remote backend by declaring it in a terraform block in one of the project's .tf files:
terraform {
backend "s3" {
   bucket = "some-bucket"
   key = "some-storage-key"
   region = "us-east-1"
}
}
Modules
Terraform modules are the main feature that allows us to reuse resource definitions across multiple projects or simply have a better organization in a single project. This is much like what we do in standard programming: instead of a single file containing all code, we organize our code across multiple files and packages.
A module is just a directory containing one or more resource definition files. In fact, even when we put all our code in a single file/directory, we're still using modules - in this case, just one. The important point is that sub-directories are not included as part of a module. Instead, the parent module must explicitly include them using the module declaration:
Here we're referencing a module located at the "networking" sub-directory and passing a single parameter to it - a boolean value in this case.
It's important to note that in its current version, Terraform does not allow the use of count and for_each to create multiple instances of a module.
Input Variables
Any module, including the top, or main one, can define several input variables using variable block definitions:
variable "myvar" {
   type = string
   default = "Some Value"
   description = "MyVar description"
}
A variable has a type, which can be a string, map, or set, among others. It also may have a default value and description. For variables defined at the top-level module, Terraform will assign actual values to a variable using several sources:
- -var command-line option
- .tfvar files, using command-line options or scanning for well-known files/locations
- Environment variables starting with TF_VAR_
- The variable's default value, if present
As for variables defined in nested or external modules, any variable that has no default value must be supplied using arguments in a module reference. Terraform will generate an error if we try to use a module that requires a value for an input variable but we fail to supply one.
Once defined, we can use variables in expressions using the var prefix:
Output Values
By design, a module's consumer has no access to any resources created within the module. Sometimes, however, we need some of those attributes to use as input for another module or resource. To address those cases, a module can define output blocks that expose a subset of the created resources:
output "web_addr" {
   value = "${aws_instance.web.private_ip}"
   description = "Web server's private IP address"
}
Here we're defining an output value named "web_addr" containing the IP address of an EC2 instance that our module created. Now any module that references our module can use this value in expressions as module.module_name.web_addr, where module_name is the name we've used in the corresponding module declaration.
Local Variables
Local variables work like standard variables, but their scope is limited to the module where they're declared. The use of local variables tends to reduce code repetition, especially when dealing with output values from modules:
locals {
   vpc_id = "${module.network.vpc_id}"
}
module "network" {
   source = "./network"
}
module "service1" {
   source = "./service1"
   vpc_id = "${local.vpc_id}"
}
module "service2" {
   source = "./service2"
   vpc_id = "${local.vpc_id}"
}
Here, the local variable vpc_id receives the value of an output variable from the network module. Later, we pass this value as an argument to both service1 and service2 modules.
Workspaces
Terraform workspaces allow us to keep multiple state files for the same project. When we run Terraform for the first time in a project, the generated state file will go into the default workspace. Later, we can create a new workspace with the terraform workspace new command, optionally supplying an existing state file as a parameter.
We can use workspaces pretty much as we'd use branches in a regular VCS. For instance, we can have one workspace for each target environment - DEV, QA, PROD - and, by switching workspaces, we can terraform apply changes as we add new resources.
Given the way this works, workspaces are an excellent choice to manage multiple versions - or "incarnations" if you like - of the same set of configurations. This is great news for everyone who's had to deal with the infamous "works in my environment" problem, as it allows us to ensure that all environments look the same.
In some scenarios, it may be convenient to disable the creation of some resources based on the particular workspace we're targeting. For those occasions, we can use the terraform.workspace predefined variable. This variable contains the name of the current workspace, and we can use it as any other in expressions.
Terraform Lifecycle
Terraform lifecycle consists of - init, plan, apply, and destroy.

- terraform init initializes the working directory which consists of all the configuration files
- terraform plan is used to create an execution plan to reach a desired state of the infrastructure. Changes in the configuration files are done in order to achieve the desired state.
- terraform apply then makes the changes in the infrastructure as defined in the plan, and the infrastructure comes to the desired state.
- terraform destroy is used to delete all the old infrastructure resources, which are marked tainted after the apply phase.
terraform init
Let us look into small terraform code to execute and understand the basics.
Create main.tf and add the below contents into the main.tf file to understand about the terraform lifecycle.
resource "local_file" "hello" {
   content              = "Hello, Terraform"
   directory_permission = "0777"
   file_permission      = "0777"
   filename             = "hello.txt"
}
Since this is the first time we're running this project, we need to initialize it with the init command:
$ terraform init

Initializing the backend...

Initializing provider plugins...
- Checking for available provider plugins...
- Downloading plugin for provider "local" (hashicorp/local) 2.2.3...

Terraform has been successfully initialized!
... more messages omitted
In this step, Terraform scans our project files and downloads any required provider -- the local provider, in our case.
terraform plan
we use the plan command to verify what actions Terraform will perform to create our resources. This step works pretty much as the "dry run" feature available in other build systems, such as GNU's make tool:
$ terraform plan
... messages omitted
Terraform will perform the following actions:

# local_file.hello will be created
+ resource "local_file" "hello" {
      + content              = "Hello, Terraform"
      + directory_permission = "0777"
      + file_permission      = "0777"
      + filename             = "hello.txt"
      + id                   = (known after apply)
   }

Plan: 1 to add, 0 to change, 0 to destroy.
... messages omitted
Here, Terraform is telling us that it needs to create a new resource, which is expected as it doesn't exist yet. We can also see the provided values we've set and a pair of permission attributes. As we haven't supplied those in our resource definition, the provider will assume default values.
terraform apply
We can now proceed to actual resource creation using the apply command:
$ terraform apply

An execution plan has been generated and is shown below.
Resource actions are indicated with the following symbols:
+ create

Terraform will perform the following actions:

# local_file.hello will be created
+ resource "local_file" "hello" {
      + content              = "Hello, Terraform"
      + directory_permission = "0777"
      + file_permission      = "0777"
      + filename             = "hello.txt"
      + id                   = (known after apply)
   }

Plan: 1 to add, 0 to change, 0 to destroy.

Do you want to perform these actions?
Terraform will perform the actions described above.
Only 'yes' will be accepted to approve.

Enter a value: yes

local_file.hello: Creating...
local_file.hello: Creation complete after 0s [id=392b5481eae4ab2178340f62b752297f72695d57]

Apply complete! Resources: 1 added, 0 changed, 0 destroyed.
We can now verify that the file has been created with the specified content:
All good! Now, let's see what happens if we rerun the apply command, this time using the -auto-approve flag so Terraform goes right away without asking for any confirmation:
$ terraform apply -auto-approve
local_file.hello: Refreshing state... [id=392b5481eae4ab2178340f62b752297f72695d57]
Apply complete! Resources: 0 added, 0 changed, 0 destroyed.
This time, Terraform did nothing because the file already existed. That's not all, though. Sometimes a resource exists, but someone may have changed one of its attributes, a scenario that is usually referred to as "configuration drift". Let's see how Terraform behaves in this scenario:
$ echo foo > hello.txt
$ terraform plan
Refreshing Terraform state in-memory prior to plan...
The refreshed state will be used to calculate this plan, but will not be
persisted to local or remote state storage.
local_file.hello: Refreshing state... [id=392b5481eae4ab2178340f62b752297f72695d57]
------------------------------------------------------------------------
An execution plan has been generated and is shown below.
Resource actions are indicated with the following symbols:
+ create
Terraform will perform the following actions:
# local_file.hello will be created
+ resource "local_file" "hello" {
+ content = "Hello, Terraform"
+ directory_permission = "0777"
+ file_permission = "0777"
+ filename = "hello.txt"
+ id = (known after apply)
}
Plan: 1 to add, 0 to change, 0 to destroy.
... more messages omitted
Terraform has detected the change in the hello.txt file's content and generated a plan to restore it. Since the local provider lacks supports for in-place modification, we see that the plan consists of a single step -- recreating the file.
We now can run apply again and, as a result, it will restore the contents of the file to its intended content:
$ terraform apply -auto-approve
... messages omitted
Apply complete! Resources: 1 added, 0 changed, 0 destroyed.
$ cat hello.txt
Hello, Terraform
terraform destroy
It would destroy the resources which we created from current directory and according to the state file.
$ terraform destroy --auto-approve
... more messages omitted

Terraform will perform the following actions:

# local_file.hello will be destroyed
- resource "local_file" "hello" {
      - content              = "Hello, Terraform" -> null
      - directory_permission = "0777" -> null
      - file_permission      = "0777" -> null
      - filename             = "hello.txt" -> null
      - id                   = "392b5481eae4ab2178340f62b752297f72695d57" -> null
   }

Plan: 0 to add, 0 to change, 1 to destroy.
... more messages omitted
Created: June 17, 2023 21:48:54